Skip to content

Inventory Control overview

The Inventory Control lets you manage warehouse bins and their contents. You can view bin details, recount products, move items between bins, rename bins, and perform other bin operations.

bins management

Inventory Control is a feature that helps you manage warehouse storage locations (bins) and their contents. You can view what’s in each bin, update quantities, move products, and perform various bin operations.

Main purpose:

  • View bin contents and details
  • Recount products in bins
  • Move products between bins
  • Rename bins
  • Create new bins
  • Update bin quantities and settings
  • Manage bin categories and locations

View Bin Details

See what products are in each bin, quantities, locations, and other important information. Know your inventory at a glance.

Update Quantities

Recount products when quantities don’t match records. Keep your inventory accurate with easy recounting.

Move Products

Move products between bins when needed. Reorganize inventory quickly and efficiently.

Manage Bin Settings

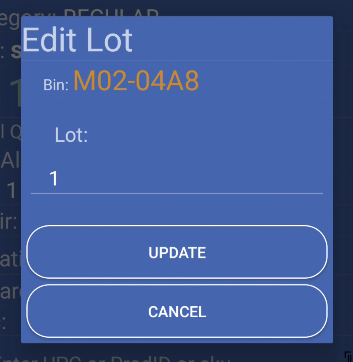
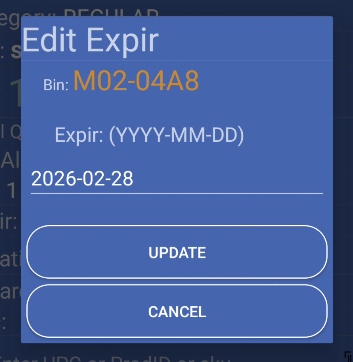
Rename bins, change categories, update locations, and manage bin information. Keep your warehouse organized.

  1. Open the Main Menu

    From the login screen, sign in with your credentials. You’ll see the main menu with all available features.

  2. Select Inventory Control

    Tap the Inventory Control icon in the main menu. The app checks your user permissions and opens the Inventory Control screen.

  3. Search for a Bin

    Enter or scan a Bin, Product ID, UPC, SKU, or Location to view bin details and available operations.

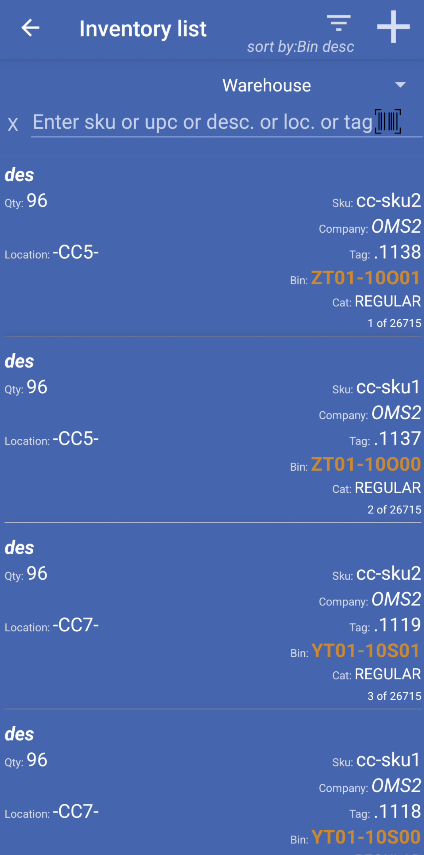
The Inventory Control screen shows:

Main elements:

  • Search field: Enter or scan Bin, Product ID, UPC, SKU, or Location
  • Send button: Process your search after entering bin information
  • Bin details view: Shows product information and available operations
  • Camera icon: Tap to use the device camera for barcode scanning

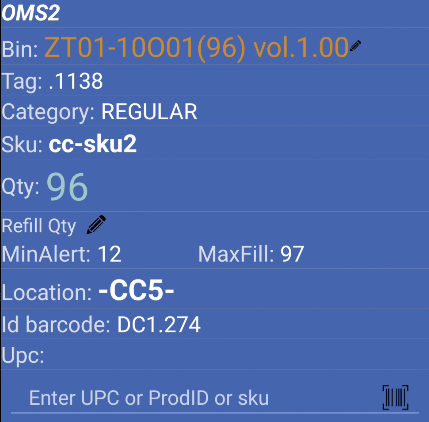
Information shown for each bin:

  • Bin name
  • Product details (SKU, Product ID)
  • Quantity in bin
  • Quantity processing (if any)
  • Company/Account name
  • Location
  • Category
  • Bin Tag
  • LPN (License Plate Number) if applicable
  • Lot and expiration date
  • UOM (Unit of Measure)
  • Product images (if available)

When you view a bin, you can perform these operations:

view bin details

What it shows:

  • Current quantities
  • Product information
  • Location and category
  • Processing status

How to use:

  • Enter or scan a bin to see its details
  • View all products and their quantities
  • See bin location and category information

recount products

What it does:

  • Updates product quantities in a bin
  • Records recount reason and type (if required)
  • Updates inventory records

When to use:

  • When quantities don’t match records
  • After physical inventory checks
  • When correcting inventory errors

Requirements:

  • User must have recount permissions
  • Product must not be serialized (serials not supported)

move products

What it does:

  • Moves products from one bin to another
  • Updates both source and destination bins
  • Handles quantity changes during moves

How to use:

  • View the source bin
  • Enter destination bin or LPN
  • Enter quantity to move
  • Confirm the move

Note: The app verifies bins are available and locations are valid before moving.

refill quantity

What it does:

  • Updates minimum and maximum quantities for a bin
  • Sets refill thresholds
  • Helps manage bin capacity

When to use:

  • Setting up new bins
  • Adjusting refill levels
  • Managing bin capacity

swap

What it does:

  • Swaps a bin’s category to match the location category
  • Enables bin to use the location’s category
  • Updates bin classification to match location

When to use:

  • When bin category doesn’t match location category
  • Reorganizing bin categories to match locations
  • Enabling bins to use location categories

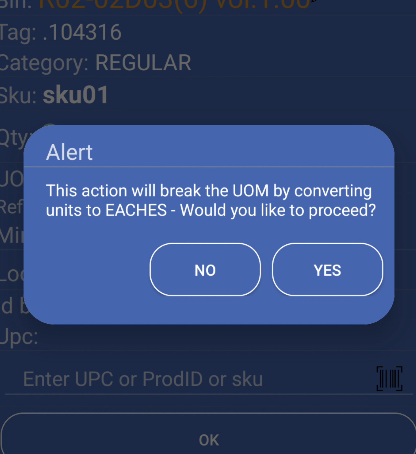
Move and Swap both change where inventory lives, but they solve different problems. Use Move when you need to transfer a quantity of product. Use Swap when you need to relocate the bin (or its assignment) to another bin or location and align it with the location category.

MoveSwap
What changesA quantity of the SKU moves from the source bin to a destination bin or LPNThe bin is moved or renamed to a new bin or location; category is aligned with the destination
Typical inputDestination in To, amount in To Qty (plus/minus as needed)Destination bin or location in To; confirmation asks about swap with the location category
Partial transferYes—you move only the quantity you enterNo—this is not the same “move X units” flow as Move
Same SKU in several binsYou work from the bin you openedIf the same product appears in multiple bins, you may see Swap from… to pick the source bin
New destinationThe app checks bins and locations; you can target an LPN for shipping flowsIf the SKU is not already at that location, you may get a prompt to proceed; creating a bin at the destination can ask for volume
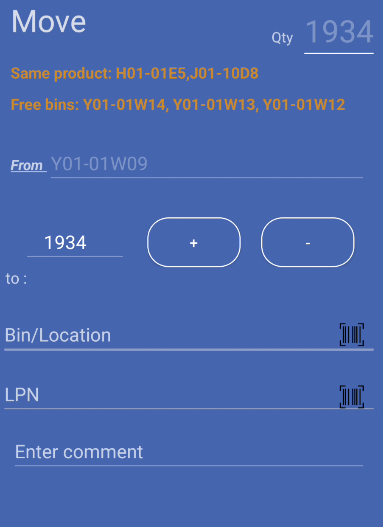
Examples — Move

  • You have 80 units of SKU WIDGET-01 in bin A-12-03 but only need 25 in the pick face: open A-12-03, tap Move, set To to PICK-04 and To Qty to 25. The source bin keeps the remaining quantity.
  • Consolidation: move quantity from a overflow bin into a primary storage bin before a shift ends.

Examples — Swap

  • The bin’s category does not match the aisle category at the new slot: use Swap to relocate the bin to the correct location so the system updates the bin and category together.
  • You must place the whole bin identity at a new location (not split a partial quantity): Swap matches the rename-style workflow described in the detailed operations guide.

Note: For step-by-step screens and dialogs (including Swap from… and category confirmation), see Inventory Control operations.

edit lot and expirationedit lot and expiration

What it does:

  • Updates lot numbers and expiration dates
  • Changes product lot information
  • Updates inventory records

When to use:

  • Correcting lot information
  • Updating expiration dates
  • Managing product lots

What it does:

  • Prepares bin information for printing
  • Generates bin labels or reports
  • Marks bin as ready to print

When to use:

  • Creating bin labels
  • Printing bin information
  • Generating reports

break uom

What it does:

  • Divides units of measure
  • Converts between UOMs
  • Updates quantities accordingly

When to use:

  • Converting product units
  • Breaking down larger units
  • Managing unit conversions

The inventory control process follows these steps:

  1. Search for bin: Enter or scan Bin, Product ID, UPC, SKU, or Location
  2. View bin details: See all products and information in the bin
  3. Choose operation: Select the operation you want to perform
  4. Complete operation: Follow on-screen instructions
  5. Confirm changes: Verify and confirm your changes
  6. View results: See updated bin information

When viewing a bin, you see:

  • Product list with quantities
  • Location and category
  • Processing status
  • Available operations
  • Product images (if available)

Work with locations:

  • View bins by location
  • Move bins to new locations
  • Verify location compatibility
  • Handle location changes

Manage LPNs (License Plate Numbers):

  • View LPNs in bins
  • Move products using LPNs
  • Handle LPN changes
  • Verify LPN locations

Verify Before Changing

Always check bin details before making changes. Make sure you’re working with the correct bin and product.

Use Scanning

Scan bins and products for faster work. Scanning is more accurate than typing codes manually.

Confirm Locations

Verify locations when moving bins. Make sure destination locations are correct and compatible.

Complete Recounts Properly

Provide reason and type when recounting (if required). This helps track why quantities changed.

Next Steps: