Use Scanning
Scan bins, locations, tags, SKUs, UPCs, or product IDs instead of typing. This is faster and reduces errors.
The Load & Move module helps you organize inventory by moving products to locations and managing blocked bins. This module has two main workflows: PUT AWAY for moving products to specific locations, and BLOCKED BIN for relocating bins that are blocked.
This guide walks you through both workflows step by step.
The PUT AWAY workflow helps you move products to their correct warehouse locations.
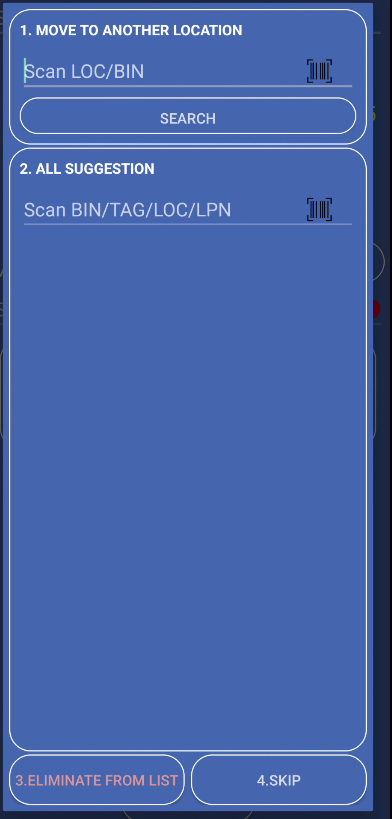
Start by entering the location, bin, or LPN you want to work with.
Open PUT AWAY tab
Tap the PUT AWAY tab at the top of the Load & Move screen. The Put Away layout appears.
Enter search value
In the search field at the top, enter or scan:
You can enter the value in three ways:
Select categories (first time only)
The first time you search, a category selection dialog appears:
Load the location
Tap the Load button or press Enter. The app searches for products at that location and shows a list.
After loading, you’ll see a list of locations ready for put away.
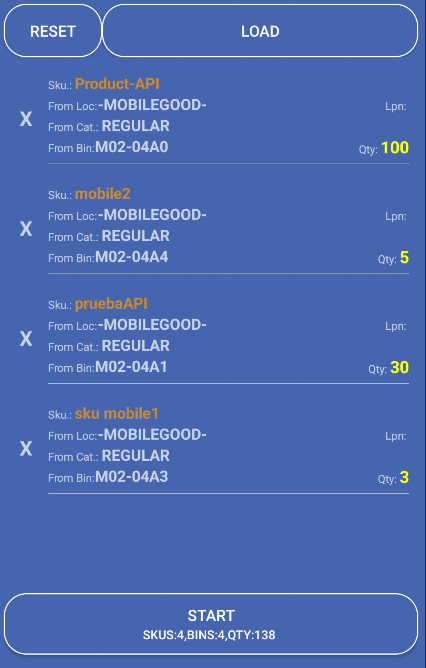
List information:
List actions:
Begin processing items from the list and work through each item, moving products to their destination locations.
Tap Start
Tap the Start button. The Put Away Detail screen opens showing the first item.
View item details
The detail screen shows:
Scan or enter SKU (if needed)
In the “Scan SKU/UPC/ProdID/Barcode UOM” field at the top:
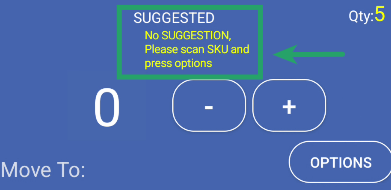
Check suggestions (if available)
If bins are suggested:
Enter quantity
Set the quantity to move:
Enter destination bin
In the “Move To: Scan BIN/TAG/LOC/LPN” field:
Move to bin
After entering destination bin and quantity, press Enter. The product is moved to the new location.
Use ALL TO LOCATION (if multiple items)
If you have multiple items to move to the same location:
Options menu:
Suggestion bins:
ALL TO LOCATION button:
The BLOCKED BIN workflow helps you manage bins that are blocked or need relocation.
Start by getting the list of blocked bins from the system.
Open BLOCKED BIN tab
Tap the BLOCKED BIN tab at the top of the Load & Move screen. The Blocked Bin layout appears.
View current list
The screen shows any blocked bins already stored locally. If this is your first time, the list may be empty.
Get blocked bins from server
Tap the GET BLOCKED BINS button:
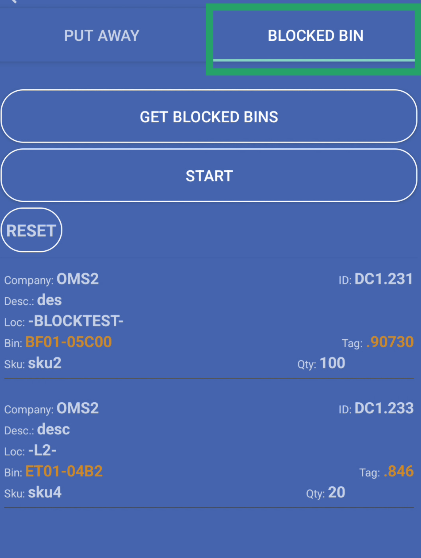
Review the list
After loading, you’ll see a list of blocked bins showing:

Begin processing blocked bins one by one.
Verify list is loaded
Make sure the blocked bins list shows items. The START button is only enabled when there are bins to process.
Tap START
Tap the START button. The Blocked Bin Start screen opens in full screen mode.
View first blocked bin
The screen shows details of the first blocked bin:
Work through each blocked bin, either relocating it or skipping it.
Choose action
You have three options:
Enter destination (if relocating)
If relocating a bin:
Continue to next bin
After processing (relocate or skip), the next blocked bin appears automatically. Repeat until all bins are processed.
GET BLOCKED BINS:
START:
Skip:
Relocate:
Finish:
RESET:
Scan bins, locations, tags, SKUs, UPCs, or product IDs instead of typing. This is faster and reduces errors.
Double-check location codes before moving products or bins. This prevents products from going to the wrong place.
Choose the right product categories when loading Put Away. This filters the list to show only relevant products.
In Put Away detail screen, check suggested bins. These help you find appropriate destination locations.
Use Reset button to clear lists when starting fresh. This prevents confusion from old data.
Problem: You see “Enter location or bin or lpn” error.
Solution: Make sure you’ve entered a value in the search field before tapping Load. The field cannot be empty.
Problem: You see “No data to move” when trying to relocate blocked bins.
Solution: Make sure you’ve processed bins and added them to the move list. The relocate option only works when there are bins ready to move.
Problem: Destination bin is not found or invalid.
Solutions:
Next Steps: